Carpenter Lustre Guide
Table of Contents
- 1. Introduction
- 1.1. Document Scope
- 2. Lustre
- 2.1. Lustre Overview
- 2.2. Lustre Architecture
- 2.3. Lustre File Systems on Carpenter
- 3. What You Can Do with Lustre
- 3.1. Lustre Commands
- 4. Lustre Stripe Guidance
- 4.1. Get the Current Stripe Count of a File or Directory
- 4.2. Setting Stripe Configurations
- 4.3. Changing the Stripe Size
- 4.4. Optimizing the Stripe Count
- 4.5. Lustre Pools
- 5. Progressive File Layouts (PFLs)
- 5.1. Creating a PFL File
- 5.2. Adding and Deleting PFL File Components
- 5.3. Setting a Default PFL Layout to an Existing Directory
- 5.4. Using Pools with PFL
- 5.5. Suggested PFL
- 6. Parallel I/O
- 6.1. Concepts
- 6.1.1. Serial I/O
- 6.1.2. Parallel I/O Strategies
- 6.1.3. Parallel File System Strategies
- 7. Best Practices
- 8. Additional Resources
- 8.1. Message Passing Interface (MPI)-IO
- 8.2. Parallel Libraries
- 8.2.1. NetCDF
- 8.2.2. Hierarchical Data Format version 5 (HDF5)
- 9. Glossary
1. Introduction
HPC systems at the ERDC DSRC employ the Lustre high-performance, parallel file system Parallel File System - A software component designed to store data across multiple networked servers and to facilitate high-performance access through simultaneous, coordinated input/output operations (IOPS) between clients and storage nodes. for storage of user data. Storage locations using Lustre include user home ($HOME) and temporary work directories (e.g., $WORKDIR, $WORKDIR2) as well as directories for user projects and applications.
1.1. Document Scope
This document provides an overview and introduction to the use of Lustre on the HPE Cray EX4000 (Carpenter)located at the ERDC DSRC. The intent of this guide is to provide information that will enable the average user to have a better understanding of parallel file system File System - A method and data structure the operating system uses to control how data is stored and retrieved.s and Lustre. This document is restricted to the file system(s) containing the temporary user work directories (i.e., $WORKDIR). It describes some of the general physical characteristics of a typical Lustre file system, technical specifications of our work file system, provides stripe guidance, reviews Lustre commands, and tips on optimizing I/O performance. Parallel I/O concepts and interfaces available on Carpenter are also discussed.
To receive the most benefit from the information provided here, you should have experience in the following areas:
- Use of the Linux operating system
- Remote use of computer systems via network
- A selected programming language and its related tools and libraries
We suggest you review the Carpenter User Guide before using this guide.
2. Lustre
2.1. Lustre Overview
Lustre is an open-source, parallel, distributed, file system designed for massive scalability, high-performance, and high-availability. Lustre runs on Linux operating systems and employs a client-server network architecture. The name Lustre is a portmanteau derived from Linux and cluster.
Lustre is designed so capacity and throughput performance scale easily from platforms of a few terabytes to hundreds of petabytes. Lustre is Portable Operating System Interface (POSIX) Portable Operating System Interface (POSIX) - A set of formal descriptions that provide a standard for the design of operating systems, especially ones which are compatible with Unix.-compliant, which ensures I/O compatibility when programs are moved from one Linux platform to another.
Parallelism is achieved by splitting files into data blocks called stripes and spreading file data across multiple storage servers, which can be written-to and read-from in parallel. Striping Striping - The process of partitioning data into chunks, known as "stripes," and writing the stripes across multiple OSTs. increases bandwidth because multiple processes can simultaneously access the same file. Striping also affords the ability to store large files that would take more space than a single file system.
2.2. Lustre Architecture
The Lustre file system architecture separates metadata services and data services to deliver parallel file access and improve performance. Lustre file metadata is managed by a Metadata Server (MDS) Metadata Server (MDS) - Manages metadata operations. Separates metadata storage from block data storage (file content). Records file system namespace data. Provides the index to the file system. Uses index nodes (inodes) to store information about any Linux file except its name and data (file permissions, file size, timestamps, etc.). It is not involved in any file I/O operations., while the actual metadata is preserved on a Metadata Target (MDT) Metadata Target (MDT) - The storage device used to hold metadata content persistently. Stores namespace data (file names, directories, access permissions, etc.) in a local disk file system.. Data services consist of a series of I/O servers called Object Storage Servers (OSS) Object Storage Server (OSS) - Provides the bulk data storage for all file content. Each OSS provides access to a set of storage volumes referred to as Object Storage Targets (OSTs) and persistent storage Persistent Storage - Any data storage device that retains data after power to that device is shut off. targets where the physical data resides called Object Storage Targets (OST) Object Storage Target (OST) - The location of actual file storage. A dedicated local disk storage system that exports an interface to byte ranges of file objects for read/write operations, with extent locks to protect data consistency. The capacity of a Lustre file system is the sum of the capacity provided by the OSTs.. The OSSs are responsible for managing OSTs and handling all OST I/O requests. A single OSS typically manages multiple OSTs.
A notional diagram of a Lustre file system is shown below, with one MDS, one
MDT, three OSSs, and two OSTs per OSS for a total of six OSTs.
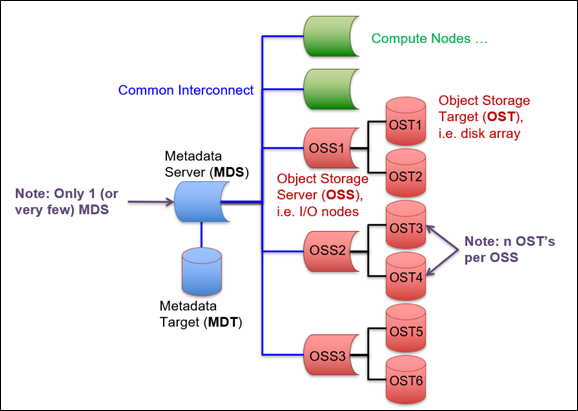
Lustre file systems on HPCMP systems are shared between multiple users and applications, which can cause contention for Lustre components and can overburden the file system. Because of this, users should minimize file I/O whenever possible. Users should also take care when sending a large file to a single OST or sending multiple small files to a single OST to not fill up the OST. In both cases multiple OSTs should be considered to prevent this from happening.
2.3. Lustre File Systems on Carpenter
Lustre uses binary (base-2) units of measurement, which may be unfamiliar to some users. The difference between a decimal (base-10) kilobyte (KB) and a binary (base-2) kibibyte (KiB or k) is only 2.4%. Because this difference is so small, it was acceptable to use the familiar decimal terms when storage capacities were at smaller scales. But as capacities grew to tera- and peta-scales, that percentage also grew (10% and 12.5% respectively), causing capacities stated in decimal units to be increasingly different from their binary counterparts. This document adopts the default Lustre nomenclature for data sizes, which uses kMGTPE (instead of KiB, MiB, GiB, etc.) for specifying the respective size in binary bytes.
The following table lists technical specifications for the Lustre work file systems on Carpenter.
| File System | Number of OSTs | OST Capacity | Max Capacity | Type |
|---|---|---|---|---|
| /p/work | 38 | 100.3 T | 3.72 P | SSD |
| /p/global | 80 | 65.7 T | 5.26 P | SSD |
| 72 | 269.4 T | 19.40 P | HDD |
3. What You Can Do with Lustre
Lustre's lfs utility includes commands for retrieving information about the Lustre file system. This utility is also used to set values for options you choose to use. With lfs you can create a new file with a specific striping pattern, display the default striping pattern, list OST information, list quota limits, and define a Progressive File Layout (PFL).
3.1. Lustre Commands
Some of the most used lfs options are shown below. See the lfs man page (man lfs) for a complete list of available options for all commands. Using lfs to define a PFL is discussed in Section 5.1.
| Command | Description |
|---|---|
| lfs check mds|osts|servers|all | Display the status of MDS, OSTs, or servers. |
| lfs data_version [-nrw] file_name | Display the current version of file data (similar to a checksum).
-n - the data version is read without taking a lock.
-r - the data version is read after dirty pages on clients are flushed. -w - the data version is read after all caching pages on clients are flushed. |
| lfs df | Report file system disk space use or inode Index Node (Inode) - Stores file information such as file permissions, file size, timestamps. Does not store file name of data. use of each MDT/OST. |
| lfs find dir_name|file_name [[!] --name pattern] | Find the file that match the given parameters recursively in a directory or file tree. The --name option is one among many options and, if used, searches for a file that matches pattern. If also used, "!" (pronounced NOT) negates the search, returning items that do not match pattern. |
| lfs getname | List Lustre file systems and the corresponding mount points. |
| lfs getstripe file_name1 file_name2 ... | List striping info for given file or files. |
| lfs getstripe [-r] dir_name1 dir_name2 ... | List striping info for the given directory and its contents. If -r is used, the listing is recursive. |
| lfs getstripe -d dir_name1 dir_name2 ... | List the striping info for the given directory or directories. |
| lfs help | Display help. |
| lfs --list-commands | List commands available in lfs. |
| lfs osts file_system | List the OSTs for a given file system or for all mounted file systems if no file system is given. |
| lfs pool_list file_system | Display a list of pools available on the given file system. |
| lfs quota -u $USER file_system | Display disk usage and limits for $USER on the given file system. |
| lfs setstripe dir_name(s)|file_name(s) | Set striping info for given file(s) or director(ies). This is discussed in detail in Section 4. |
4. Lustre Stripe Guidance
A Lustre parallel file system automatically partitions data into chunks, known as "stripes," and writes the stripes in round-robin fashion across multiple OSTs. This process, called "striping," can significantly improve file I/O speed by eliminating single-disk bottlenecks. Advantages of striping include:
- increased I/O bandwidth due to multiple areas of the files being read or written in parallel
- improved load balance across the OSTs
Despite these potential advantages, striping has disadvantages if done incorrectly, such as:
- increased overhead due to internal network operations and server contention
- degraded bandwidth through inappropriate stripe settings
The striping pattern for a Lustre file is primarily set by two parameters: stripe count Stripe Count - The number of stripes into which a file is divided. and stripe size Stripe Size - The size of the stripe written as a single block to an OST.. The stripe count controls how many OSTs the file is striped across, and the stripe size controls how much data is written to each OST before moving to the next OST in the layout. So, for stripe counts > 1, each stripe of the file resides on a different OST.
Most HPCMP systems set a default stripe count and a default stripe size for each file system. These are set to provide good performance for general I/O use, but you may want to tailor these settings specifically for your I/O use case. For example, if your jobs generate small files (< 1G), you should use a stripe count of 1. However, setting the stripe count too low can degrade I/O performance for larger files and parallel I/O. So, you should be careful to match stripe specifications to your I/O data patterns.
Striping Flow Example
Suppose you need to write 200 M to a file that has a stripe count of 10 and a stripe size of 1 M. When the file is initially written, ten 1 M blocks are simultaneously written to ten different OSTs. Once those ten blocks are filled, Lustre writes another ten 1 M blocks to those same ten OSTs. This process repeats twenty times until the entire file has been written. When done, the file will exist as twenty 1 M blocks of data on each of ten separate OSTs.
4.1. Get the Current Stripe Count of a File or Directory
To display the layout of a given file or the layout used for new files in a
given directory, use the command:
lfs getstripe file_name | dir_name | root
For example, to get the stripe information for all directories and files under the $WORKDIR, use:
% lfs getstripe $WORKDIR
/p/work/user1
stripe_count:  1 stripe_size:   1048576 pattern:       0 stripe_offset: -1
In this example, the default stripe count is 1 (data is striped over a single OST), the default stripe size is 1 M, and the objects are created over all available OSTs (stripe_offset: -1). If the getstripe command is run against the file system root directory, it displays the default layout for the whole file system, which is inherited by all new files that don't specify a layout at creation time or inherit one from the layout of a parent directory. The lfs getstripe -d dir_name command returns only the layout of the specified directory.
Carpenter has two work file systems (/p/work and /p/global) and each one uses a PFL by default. See Section 5 for a detailed discussion of PFLs.
The PFL for /p/work on Carpenter can be broken down as follows:
| File System | File Size | Stripe Count | Stripe Size | OST Type |
|---|---|---|---|---|
| /p/work | 0 - 100 M | 1 | 1 M | HDD |
| 100 M - 1 G | 2 | 1 M | HDD | |
| 1 G - 10 G | 4 | 1 M | HDD | |
| 10 G - 100 G | 8 | 1 M | HDD | |
| 100 G - 1 T | 16 | 1 M | HDD | |
| 1 T - 4 T | 24 | 1 M | HDD | |
| >4 T | 32 | 1 M | HDD |
The PFL for /p/global on Carpenter can be broken down as follows:
| File System | File Size | Stripe Count | Stripe Size | OST Type |
|---|---|---|---|---|
| /p/global | 0 - 2 G | 1 | 1 M | SSD |
| 2 G - 18 G | 4 | 1 M | SSD | |
| >18 G | 8 | 1 M | HDD |
4.2. Setting Stripe Configurations
The stripe count determines how many OSTs are used to store the file data. The stripe size determines how much data is written to an OST before moving to the next OST in the layout. Older HPCMP systems (pre June 2023) set stripe_count=1 and stripe_size=1M as a default. Newer systems (post June 2023) use a PFL. A stripe count of 1 yields a single file on a single OST, and parallel I/O is not used when writing the file to the file system.
If you want to use multiple OSTs, you may need to change the stripe configuration
for that file or for that directory. To set the layout of a given file or directory,
use the command:
lfs setstripe stripe_options file_name | dir_name
For existing files, setstripe returns an error. Otherwise, it creates an empty file with the specified stripe options. Using setstripe on a directory changes the stripe settings for the directory. Any new file created in the directory inherits those settings, but existing files in the directory are unaffected. Layout options not explicitly set are inherited from the parent directory or from the file system default.
Note: Once a file has been written to Lustre with a particular stripe configuration, you can't simply use setstripe to change it. The file must be re-written with a new configuration. Generally, to change the striping of a file, you can:
- use setstripe to create a new, empty file with the desired stripe settings and then copy (cp not mv) the old file to the new file, or
- setup a directory with the desired configuration and copy (cp not mv) the file into the directory.
The primary options for lfs setstripe are:
- -c to set the stripe count; a value of 0 uses the system wide default; a value of -1 stripes over all available OSTs
- -S to set the stripe size in k; 0 means use the system-wide default
To change the number of OSTs over which to stripe a file, use the command:
lfs setstripe -c|--stripe-count stripe_count file_name | dir_name
For example:
lfs setstripe -c 2 $HOME/file_name
will create a file in your home directory striped on two OSTs.
4.3. Changing the Stripe Size
Note: The current default stripe size on Carpenter is 1M. It is strongly recommended that you do not change the stripe size without good reason.
The stripe size does not affect the size of your file on disk. It only affects the distribution of file data across OSTs. It does, however, affect the amount of disk space reserved on each OST for your file. Therefore, the amount of disk space initially reserved (stripe_size*stripe_count) should be less than your file size. The smallest recommended stripe size is 512K and the maximum allowable stripe size is 4G. Stripe size must be a multiple of 64K. Stripe size has no effect on single striped files (i.e., stripe count = 1).
A good stripe size for I/O using high-speed networks is between 1M and 4M. Stripe sizes larger than 4M are likely to result in contention during shared file access. Optimal striping patterns take into account the write patterns of your application and how each process accesses its respective stripes of a file during parallel I/O. To avoid network contention, each process should access as few OSTs as possible. Thus, the best stripe size and stripe count combination is one that optimizes the parallel I/O flow while minimizing the OST access for your application. Best performance is obtained when the data is distributed uniformly to OSTs, and the parallel processes access the file at offsets that correspond to stripe boundaries. If the stripe size is a multiple of the write() size, then the file is written in a consistent and aligned way.
To change the stripe size, use the command:
lfs setstripe -S|--stripe-size stripe_size file_name | dir_name
Setting the stripe size to 0 causes the Lustre default stripe size of 1M to be used. Otherwise, stripe size must be a multiple of 64K.
4.4. Optimizing the Stripe Count
Since Carpenter has a default PFL (see Section 5), you do not need to change the stripe count for reasonably good parallel performance in many situations. However, read further if you wish to tune for even better performance than the default PFL provides and for a basic understanding of stripe counts as a foundational topic for more advanced features such as setting your own PFL.
Stripe counts of newly created files are set to the default value when not explicitly set. On most HPCMP systems, the default stripe count is 1, effectively disabling striping. If you need striping, you must set the stripe count yourself.
Different file sizes behave better with different stripe counts. In theory, the larger the number of stripes, the more parallel write performance is available. However, large stripe counts for small files can be detrimental to performance as there is an overhead in using more stripes. Optimizing the stripe count for your data often requires experimentation, but in general there are several factors to consider:
- the number of processes that will access the file simultaneously
- the projected size of the target file
- your application's I/O pattern
The following generally applies.
Small Files (< 1 G)
Small files do not need striping, unless you need a few stripes for parallel I/O. Assigning a high stripe count to a small file causes excess space to be allocated on multiple OSTs, wasting storage space. It also generates unnecessary communication overhead to multiple OSTs, which reduces application I/O performance and overall file system performance. A good practice is to have dedicated directories with a stripe count of 1 for writing small files into. Assigning a stripe count of 1 (effectively no striping) causes the entire file to be written to a single OST.
Large Files (> 1 G)
Large files benefit from more stripes. The stripe count is the number of OSTs the data is striped over. Assigning a higher stripe count causes the file to be striped over many OSTs. This increases the bandwidth for accessing the file and enables multiple processes to operate on the file at the same time. Assigning a small stripe count to a large file can cause individual OSTs to fill up, making it impossible for those OSTs to be used in other striping operations, and reducing I/O performance for the whole file system. A good practice is to have dedicated directories with high stripe counts for writing very large files into.
The following table presents common questions in determining the best stripe count for your I/O needs.
| Question | Answer |
|---|---|
| How do I determine my stripe count? | Ideally, based on your application’s I/O behavior, such as how many nodes or processes from which it writes to a single file. |
| I'm writing separate little files from each core. What should I use? | Use a stripe count of 1 for each file. |
| I'm writing one big file from 256 cores. What should I use? | If you are using all 192 cores per node, then you are using 256/192=2 nodes. Your stripe count should be a factor of 2. Try stripe counts of 2, 4, etc. |
| I'm writing one big file from 16 nodes. What should I use? | Try factors of 16 for stripe count, such as 16, 32, etc. But never exceed the number of OSTs in the file system. See the table in Section 2.3 for the number of OSTs in each file system. |
| I don't know how I'm writing my files. What do I do? | If you can't figure this out, then set the stripe count based only on the file size: see Small Files and Large Files above. Preferably, check your system for a default PFL (see Section 5), which will automatically adapt to your file size. If not, see Section 5.5 to set your own PFL. |
4.5. Lustre Pools
Lustre pools group OSTs together and are usually associated by a specific criterion, such as storage type or storage location. HPCMP Lustre file systems commonly use pools to group OSTs by type: SSD or HDD. Pools can be used to allocate files or directories. When file or directory striping is set to a pool, only OSTs in the pool are candidates for striping. This is commonly used to allocate files to SSD or HDD devices. Users cannot create pools. They can only use pools already created by Lustre administrators.
Pools available on Carpenter include:
| File System | Pools |
|---|---|
| /p/work | None |
| /p/global | ddn_ssd, ddn_hdd |
Note that /p/global has a mix of SSD and HDD pools. Generally, use SSD for smaller files with few stripes and HDD for larger files with many stripes. IMPORTANT: If you write very large files to SSD pools, you may fill up an SSD OST and crash the file system. If you write small files with few stripes to HDD pools, you may suffer a loss in performance.
Several lfs commands can be run with OST pools. Pools can only be assigned to a layout when the file or directory is created. To do this, use the lfs setstripe command to associate a directory with an OST pool. This causes all new directories and regular files in the directory to be created in the pool.
To associate a directory or file with a pool, enter:
lfs setstripe --pool|-p pool_name dir_name
Striping patterns can be set along with a pool. To set a stripe count, for example, enter:
lfs setstripe -c stripe_count -p pool_name file_name
Note: If you specify striping with an invalid pool name, lfs setstripe returns an error. Run lfs pool_list to make sure the pool exists and is entered correctly.
When specifying striping on a file system with mixed OSTs (i.e., there are SSD and HDD OSTs on the file system), you MUST make sure a pool is associated with your layout. Otherwise, you may get a mix of OST types, which will negatively affect I/O performance.
5. Progressive File Layouts (PFLs)
The standard static stripe settings are fixed when the file is created and do not change throughout the life of the file. This makes it difficult to determine a stripe count to match a workload when the file size is unpredictable. The PFL feature simplifies this by adapting the striping as the file size grows so users can expect reasonable performance for a variety of file sizes automatically. A PFL is an array of standard static layouts (i.e., components) in one file with each component having a different size and striping. The PFL initially allocates the first component of a new file. Once the file exceeds the maximum size (extent) of the first component, the second component is allocated, with different striping, and so on. The progressive layout can grow no larger than the total number of OSTs of the file system.
5.1. Creating a PFL File
To create a file with a progressive layout, specify the components of the layout
with the command:
lfs setstripe -E end1 stripe_options -E end2 stripe_options ... -E EOF stripe_options file_name
Each component defines the stripe pattern of the file in the range of [start, end], where start ≤ x < end. These ranges are referred to as the extent of the component. The first component inherits default values from the parent/root directory, and later components inherit values from the previous component. Components must be specified in order. The first component must start from offset 0, and all components must be adjacent to each other; no holes are allowed, so each extent begins at the end of previous extent. The -E option is used to specify the end offset (in bytes or using a suffix "kMGTP") stripe options for each component. A -1 or EOF end offset indicates the End-Of-File.
For example, to create a PFL file with three components in the following format,
| Component 1 Extent: 0-2G 1 stripe @ 1M |
Component 2 Extent: 2G-4G 4 stripes @ 1M |
Component 3 Extent: 4G-EOF 16 stripes @ 1M |
use the command:
lfs setstripe -E 2G -c 1 -S 1M -E 4G -c 4 -S 1M -E -1 -c 16 -S 1M file_name
When you run lfs getstripe file_name, the output will include:
% lfs getstripe file_name
file_name
  lcm_layout_gen:    3
  lcm_mirror_count:  1
  lcm_entry_count:   3
    lcme_id:             1
    lcme_flags:          init
    lcme_extent.e_start: 0
    lcme_extent.e_end:   2147483648
      lmm_stripe_count:  1
      lmm_stripe_size:   1048576
      lmm_objects:
      - 0: { l_ost_idx: 2, l_fid: [0x500000400:0x4273da:0x0] }

    lcme_id:             2
    ...
    lcme_extent.e_start: 2147483648
    lcme_extent.e_end:   4294967296
      lmm_stripe_count:  4
      lmm_stripe_size:   1048576
    ...
    lcme_id:             3
    ...
    lcme_extent.e_start: 4294967296
    lcme_extent.e_end:   EOF
      lmm_stripe_count:  16
      lmm_stripe_size:   10485
    ...
5.2. Adding and Deleting PFL File Components
Adding Components
Components can be added dynamically to an existing PFL file using the
--component-add option, as follows:
lfs setstripe --component-add -E end_1 stripe_options ... -E end_N stripe_options file_name
This allows you to change the stripe settings for portions of a file that may get appended later. Caveats for dynamically adding components include:
- The new component extent must begin (-E end_1) where the last component of the file ended (see lfs getstripe)
- All added components must be adjacent to each other
- If the last existing component is specified by -E -1 or -E EOF, which covers to the end of the file, it must be deleted before a new one is added. This will result in a loss of any data stored in that component.
Note, similar to creating a PFL, --component_add won't instantiate a component until it is needed.
Deleting Components
Each component of an existing PFL file has a unique numerical ID, as shown
in the lcme_id entries in the example lfs getstripe
output above. When deleting a component, the ID is specified using the
-I option as shown in the following command:
lfs setstripe --component-del -I component_ID file_name
Caveats for deleting components include:
- Components can only be deleted starting from the last one because holes are not allowed
- Deleting a component causes all data in that component to be lost
- You cannot write past the end of the last component
5.3. Setting a Default PFL Layout to an Existing Directory
Similar to creating a PFL file, you can set a default PFL layout for an existing
directory. Then all the files subsequently created in that directory inherit
this layout by default. To set a default PFL layout for an existing directory,
use the command:
lfs setstripe -E end1 stripe_options -E end2 stripe_options ... -E EOF stripe_options dir_name
For example:
mkdir dir_name
          lfs setstripe -E 2G -c 1 -S 1M -E 4G -c 4 -S 1M -E -1 -c 16 -S 1M dir_name
will output the following when you run the command lfs getstripe dir_name:
% lfs getstripe dir_name
dir_name
  lcm_layout_gen:    0
  lcm_mirror_count:  1
   lcm_entry_count:   3
    lcme_id:             N/A
    lcme_mirror_id:      N/A
    lcme_flags:          0
    lcme_extent.e_start: 0
    lcme_extent.e_end:   2147483648
      stripe_count:  1       stripe_size:   1048576       pattern:       raid0       stripe_offset: -1

    lcme_id:             N/A
    lcme_mirror_id:      N/A
    lcme_flags:          0
    lcme_extent.e_start: 2147483648
    lcme_extent.e_end:   4294967296
      stripe_count:  4       stripe_size:   1048576       pattern:       raid0       stripe_offset: -1

    lcme_id:             N/A
    lcme_mirror_id:      N/A
    lcme_flags:          0
    lcme_extent.e_start: 4294967296
    lcme_extent.e_end:   EOF
      stripe_count:  16       stripe_size:   1048576       pattern:       raid0       stripe_offset: -1
where lcm_entry_count (see highlighted text in output above) represents the number of components. If you create a file, file_name, under this directory and run the command lfs getstripe file_name, the output will include:
% lfs getstripe file_name
file_name
  lcm_layout_gen:    3
  lcm_mirror_count:  1
  lcm_entry_count:   3
    lcme_id:             1
    lcme_flags:          init
    lcme_extent.e_start: 0
    lcme_extent.e_end:   2147483648
      lmm_stripe_count:  1
      lmm_stripe_size:   1048576
      lmm_objects:
      - 0: { l_ost_idx: 18, l_fid: [0x780000400:0x4274e3:0x0] }

    lcme_id:             2
    lcme_extent.e_start: 2147483648
    lcme_extent.e_end:   4294967296
      lmm_stripe_count:  4
      lmm_stripe_size:   1048576

    lcme_id:             3
    lcme_extent.e_start: 4294967296
    lcme_extent.e_end:   EOF
      lmm_stripe_count:  16
      lmm_stripe_size:   1048576
You can't run lfs setstripe --component-add or lfs setstripe --component-del on a directory. However, PFL layout information for a directory can be deleted. To delete all layout information from a directory, run lfs setstripe -d dir_name. This will not affect existing files in the directory.
5.4. Using Pools with PFL
When using pools with a PFL, all components in the PFL must be assigned a pool. There can be a mix of pools across the components. For example, components 1 and 2 can be assigned to poolA, while the remaining components can be assigned to poolB. The command for assigning pools to PFL components is:
lfs setstripe -E 2G -c 1  -S 1M –pool pool_name \
              -E 4G -c 4  -S 1M –pool pool_name \
              -E -1 -c 16 -S 1M –pool pool_name file_name
5.5. Suggested PFL
If the file system you are using has a default PFL, we strongly suggest you use the default. If not, one approach for PFLs is to increment the stripe count in powers of 2 and extent in powers of 10 and begin the extent at a small size, say 100 M. This is done using the following command:
lfs setstripe -E 100M -c 1  -S 1M        \
              -E 1G   -c 2  -S 1M        \
              -E 10G  -c 4  -S 1M        \
              -E 100G -c 8  -S 1M        \
              -E -1   -c 16 -S 1M  dir_or_filename
Remember, the -1 in the last component indicates the End-Of-File. You could apply this PFL to your top-level work directory to have all new directories and files inherit it.
6. Parallel I/O
Efficient use of I/O on any HPCMP system requires an understanding of how parallel I/O functions work in both the application and Lustre. Parallel I/O focuses on multiple and simultaneous I/O operations, effectively increasing bandwidth by using multiple channels. When optimizing I/O, it needs to be considered in the context of the entire application workflow not just one program or function. The data storage structure within a program may need to be rearranged for optimal disk storage needs. Next are some concepts to consider when implementing your approach to parallel I/O.
6.1. Concepts
6.1.1. Serial I/O
Parallel applications can perform I/O in both serial and parallel. Serial I/O in parallel applications use a single process to access a single file. Such applications are generally bandwidth-limited by the amount of data that can be passed from the I/O system to a single client (usually a single compute node) leading to low I/O performance.
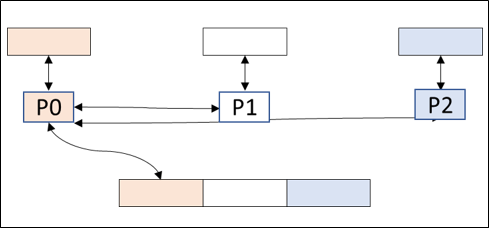
Processes P1 and P2 send data to or get data from P0. P0 is the only process to access the file.
6.1.2. Parallel I/O Strategies
Parallel I/O strategies consider how the I/O is performed. For example, a program that uses a single file and a single reader/writer has a different I/O pattern from one that uses a single file with multiple readers/writers. These I/O patterns differ from a program that uses multiple files and multiple readers/writers. So, it is necessary to understand your program's I/O implementation. How many processes are performing the I/O is another consideration when optimizing your I/O performance. Adding or deleting processes can increase or decrease performance. Finding the optimal number of processes often requires experimentation.
Three common strategies for parallel I/O include single-file parallel I/O, file-per-process, and collective buffering. Single-file parallel I/O processing uses one file for the entire program and has one file_open and one file_close. Each process has a dedicated location in the file to read data from and write data to. Processes need to communicate to avoid their writes clashing with each other. I/O performance depends on the implementation of parallel updates in the file.
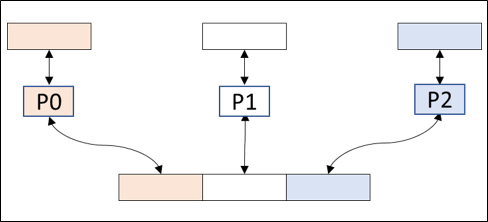
Each process is assigned a unique section of the file. All processes send data to or get data from their assigned section of the file.
The file-per-processes strategy uses one file for each process. Given N processes, this requires N file_opens, N file_closes, and N read/write streams. This strategy can generate a lot of files and may require file management. Each file produces separate overhead, making this method scalable only at small process counts.
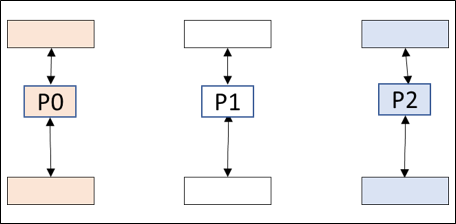
There is only one process for each file and one file per process. All processes send data to or get data from their assigned file.
The collective buffering strategy aggregates I/O operations and is mainly used for output. Within the program, aggregators transfer data to a subgroup. The data is aggregated in a tree or hierarchical sense, and the parent writes the data. The advantage of collective buffering is that fewer nodes communicate with the I/O servers, reducing contention while still attaining high performance through concurrent I/O transfers.
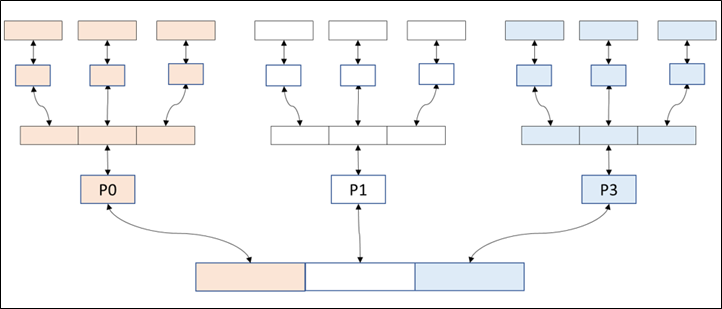
These processes are parents of a subset of child processes arranged in a tree-like hierarchy.
Each parent process is assigned a unique and non-overlapping section of a single file. All child processes send their data to their respective parent processes. Only the parent processes write data to or read data from their assigned section of the file.
6.1.3. Parallel File System Strategies
For optimal I/O performance, in addition to understanding your parallel I/O strategy, you need to consider how the I/O pattern is implemented on a parallel file system. If all parallel tasks send their data to a single task, then that task writes all the data to the file system. This strategy does not take advantage of the parallel OSTs.
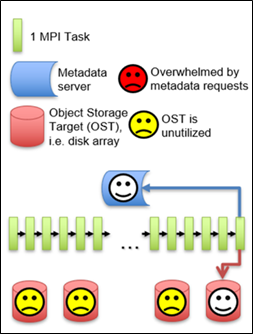
a row of MPI tasks, and an array of OSTs.
All the MPI tasks send their data to a single MPI Task. This MPI task sends all the data to a single OST.
This strategy does not take advantage of the parallel OSTs.
Consider the case where all parallel I/O tasks are distributed across a limited number of OSTs (i.e., the number of I/O streams >= the number of OSTs). All tasks sending their data to the file system at once, or even staggered, can produce an overwhelming number of metadata requests, resulting in poor I/O performance.
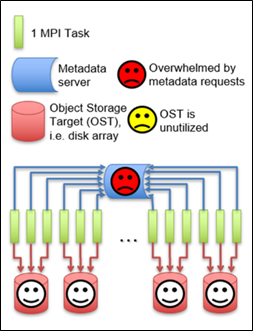
a row of MPI tasks, and an array of OSTs.
The number of MPI tasks is greater than the number of OSTs, and each OST receives data from three MPI tasks. This strategy produces many metadata requests and can overwhelm the MDS. Sending too many metadata data requests to a single MDS will result poor I/O performance.
For programs using many processes with each process producing data, the optimal approach for parallel I/O is to use collective buffering then limit the output to one I/O task per OST. This minimizes the number of metadata requests, utilizes parallel OSTs, and has fewer streams per OST.
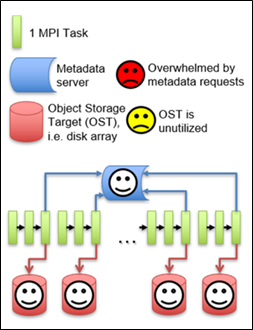
a row of MPI tasks, and an array of OSTs.
MPI tasks are grouped into sets of three, and each group is assigned to one OST. Within each group, all tasks send their data to a parent task, which writes the data to OST. This strategy minimizes the number of metadata requests while using parallel OSTs.
7. Best Practices
Below is a summary of best practices to either avoid or apply when using Lustre. For additional discussion of these best practices, see NASA's High-End Computing Capability list of Lustre Best Practices.
Practices to Avoid in Parallel I/O
- Unnecessary I/O (i.e., switch off verbose debug output for production runs)
- Unnecessary and repetitive open/close statements, which cause excessive metadata operations
- Explicit flushes of data to disk, except when needed for consistency
- Accessing attributes of files and directories (file size, permissions, etc.,)
- Using ls -l because the file size metadata is only available from the OSTs, and requests to the OSSs/OSTs are very costly
- Using wild cards because expanding the wild cards is resource intensive
- Having a large number of files in a single directory
- Accessing small files on Lustre file systems
- Having multiple processes open the same file(s) at the same time
- Small, repetitive file operations
Practices to Apply in Parallel I/O
- Perform I/O in a few large chunks. The chunk size should be a multiple of the block size or stripe size
- Prefer binary/unformatted I/O to ASCII/formatted data
- Use specialized I/O libraries based on the I/O requirements of your applications for a more portable way of writing data
- Allocate contiguous multidimensional arrays
- Limit the number of processes performing parallel I/O
- Put small files in a dedicated directory so only one OST is needed for each file
- Whenever possible, open the files as read-only using O_RDONLY
- Keep copies of your source code in your home directory
- Perform regular backups of your data to a safe location
- Use the Lustre lfs commands instead of standard Linux versions (e.g., lfs find, lfs df, etc.)
8. Additional Resources
8.1. Message Passing Interface (MPI)-IO
MPI-IO is part of MPI and has many I/O routines to close/open files, read/write data, send/receive data between processes, and perform collective data accesses. The main aim of MPI-IO is to transfer data between an MPI program and the file system. MPI-IO provides a high-level interface to support partitioning of file data among processes and a collective interface to support complete transfers of global data structures between process memories and files. The implementation of MPI-IO is typically layered on top of Lustre to support the notion of a single and common file shared by multiple processes.
File manipulation in MPI-IO is similar to basic file I/O operations. MPI-IO allows you to gain I/O performance improvements via support for asynchronous I/O, strided access Strided Access - Accessing a block of memory where the data elements are not contiguous but are separated by a fixed distance called the stride., and control over physical file layout on storage devices (disks). MPI-IO is strictly an IO Application Programming Interface (API). It treats the data file as a "linear byte stream," and each MPI application must provide its own file and data representations to interpret those bytes. Instead of defining I/O access modes to express the common patterns for accessing a shared file, the approach in the MPI-IO standard is to express the data partitioning using derived datatypes. This enables you to overlay your data with datatypes to speed up message passing.
The MPI-IO API is part of the MPI API and is included in any loaded MPI module.
8.2. Parallel Libraries
Most applications work with structured data and need self-describing file formats. High-level parallel I/O libraries are APIs which help format data in a more natural way. They simplify complex data representation, such as multi-dimensional data, labels and tags, noncontiguous data, and typed data, and they offer portable formats that can run on one machine and transfer output to another. Many HPC applications make use of high-level I/O libraries such as the Hierarchical Data Format (HDF) and the Network Common Data Format (NetCDF). Parallel versions of high-level libraries are built on top of MPI-IO and can use MPI-IO optimizations.
The following parallel libraries are installed on Carpenter.
8.2.1. NetCDF
NetCDF is a set of software libraries and self-describing, machine-independent data formats that support the creation, access, and sharing of array-oriented scientific data. NetCDF-4 provides parallel file access to both classic and netCDF-4/HDF5 files. For netCDF-4 files, parallel I/O is achieved through the HDF5 library, but classic files use Parallel-netCDF (PnetCDF). Parallel file access is either collective (all processes must participate) or independent (any process may access the data without waiting for others). All NetCDF metadata writing operations (i.e., creation of groups, types, variables, dimensions, or attributes) are collective. Data reads and writes may be independent or collective.
To load the PnetCDF libraries on Carpenter, use the following commands:
module load cseinit
            module load cse/netcdf
HPE Cray systems also include a vendor-optimized version of NetCDF loaded with this module command:
module load cray-netcdf-hdf5parallel
More information about NetCDF can be found on the NetCDF webpage.
8.2.2. Hierarchical Data Format version 5 (HDF5)
HDF5 is a versatile data model that can represent very complex data objects and a wide variety of metadata. The open-source software library runs on a wide range of computational platforms and implements a high-level API with C, C++, Fortran, and Java interfaces. HDF5 has a rich toolset and applications for managing, manipulating, viewing, and analyzing data in a collection. It has a completely portable file format with no limit on the number or size of data objects stored.
Parallel HDF5 is a configuration of the HDF5 library which lets you share open files across multiple parallel processes and allows these processes to perform I/O to an HDF5 file at the same time. It uses the MPI (Message Passing Interface) standard for inter-process communication. Consequently, when using Parallel HDF5 from Python, your application also needs the MPI library. Parallel HDF5 files are compatible with serial HDF5 files, enabling sharing between different serial or parallel platforms.
To load the parallel HDF5 libraries on Carpenter, use the following commands:
module load cseinit
          module load cse/hdf5
HPE Cray systems also include a vendor-optimized version of HDF5 loaded with
this module command:
module load cray-hdf5-parallel
More information about HDF5 can be found on the HDF5 webpage.
9. Glossary
- File System :
- A method and data structure the operating system uses to control how data is stored and retrieved.
- Index Node (Inode) :
- Stores file information such as file permissions, file size, timestamps. Does not store file name of data.
- Metadata Server (MDS) :
- Manages metadata operations. Separates metadata storage from block data storage (file content). Records file system namespace data. Provides the index to the file system. Uses index nodes (inodes) to store information about any Linux file except its name and data (file permissions, file size, timestamps, etc.). It is not involved in any file I/O operations.
- Metadata Target (MDT) :
- The storage device used to hold metadata content persistently. Stores namespace data (file names, directories, access permissions, etc.) in a local disk file system.
- Object Storage Server (OSS) :
- Provides the bulk data storage for all file content. Each OSS provides access to a set of storage volumes referred to as Object Storage Targets (OSTs)
- Object Storage Target (OST) :
- The location of actual file storage. A dedicated local disk storage system that exports an interface to byte ranges of file objects for read/write operations, with extent locks to protect data consistency. The capacity of a Lustre file system is the sum of the capacity provided by the OSTs.
- Parallel File System :
- A software component designed to store data across multiple networked servers and to facilitate high-performance access through simultaneous, coordinated input/output operations (IOPS) between clients and storage nodes.
- Persistent Storage :
- Any data storage device that retains data after power to that device is shut off.
- Portable Operating System Interface (POSIX) :
- A set of formal descriptions that provide a standard for the design of operating systems, especially ones which are compatible with Unix.
- Strided Access :
- Accessing a block of memory where the data elements are not contiguous but are separated by a fixed distance called the stride.
- Stripe Count :
- The number of stripes into which a file is divided.
- Stripe Size :
- The size of the stripe written as a single block to an OST.
- Striping :
- The process of partitioning data into chunks, known as "stripes," and writing the stripes across multiple OSTs.
