HPCMP Advance Reservation Service
User Guide
Table of Contents
- 1. Introduction
- 1.1. Document Scope and Assumptions
- 2. Logging In
- 3. Selecting a System
- 4. The Reservation Calendar
- 4.1. Viewing Daily Details
- 4.2. Searching for Job Slots
- 5. Making a Reservation
- 5.1. Reservation Options
- 5.2. Selecting Multiple Users
- 6. Reservation Confirmation
- 6.1. Viewing Your Reservations
- 7. Cancelling a Reservation
1. Introduction
1.1. Document Scope and Assumptions
The Advance Reservation Service (ARS) provides a web-based interface to batch schedulers on computational resources across the High Performance Computing Modernization Program (HPCMP). This service allows allocated users to reserve resources for later usage, at specific times, for specific durations, and works in tandem with selected schedulers to allow restricted access to those reserved resources. This document provides a guide to authorized users who want to take advantage of the ARS.
Resources reserved through ARS are expected to be utilized. Any ARS reservations found to contain idle resources may be subject to termination. Repeated incidents could result in revocation of ARS use or account suspension/termination.
2. Logging In
The first step in using the ARS is to authenticate to the server so your allocations across supported systems can be identified. The HPCMP's OpenID service is used to authenticate users upon accessing the ARS URL (https://reservation.hpc.mil). After reading and accepting the DoD banner (Page 1), you can authenticate by selecting either the PKI/CAC option or the Kerberos/YubiKey option (Page 2).

Page 1: Notice and Consent Page
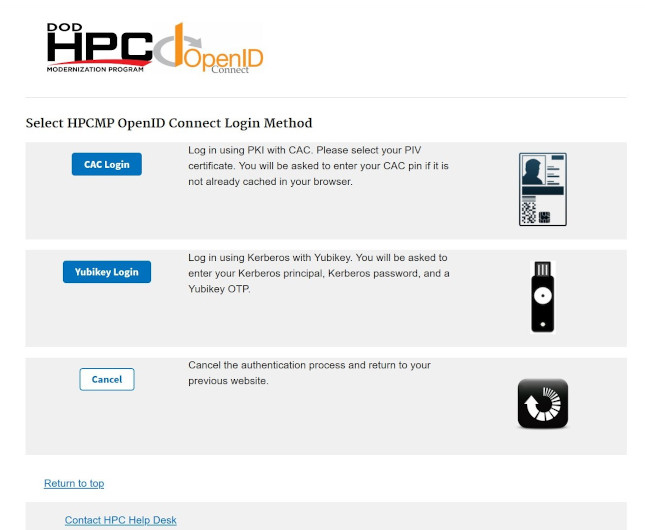
Page 2: OpenID Connect Login Method Selection
There are two ways to log in via OpenID Connect. If using the PKI/CAC method (Page 3), enter your PIN. If using the Kerberos/YubiKey method (Page 4), complete the fields, entering the YubiKey Token last.
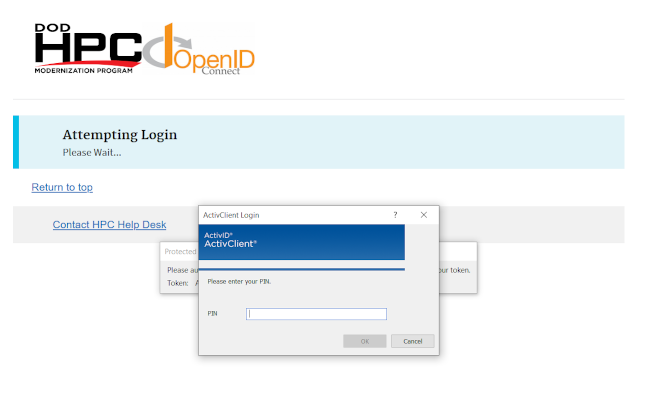
Page 3: OpenID Connect PKI/CAC Prompt
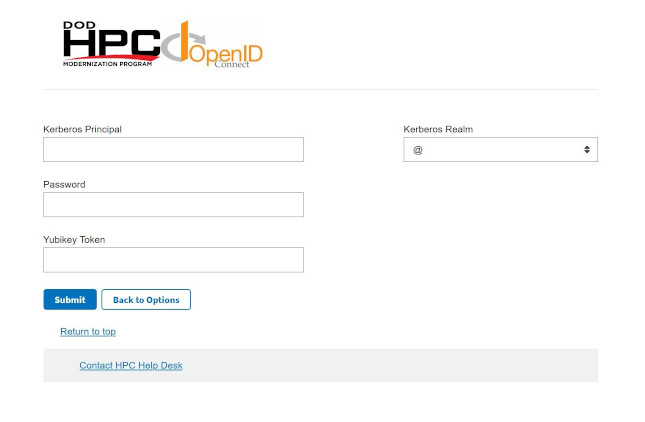
Page 4: OpenID Connect Kerberos Entry Prompt
3. Selecting a System
After successful authentication, the available systems are listed (Page 5). To generate a reservation, you must have a valid account (both Portal to the Information Environment (pIE) and local authorization) and be on a project with remaining allocation. If neither of these criteria are met, the system is not presented as an option. Even if pIE indicates you are assigned to a system, you may not be able to generate a reservation due to DSRC or allocation restrictions. If the selected system is unavailable for any reason, you are notified and can select another system.
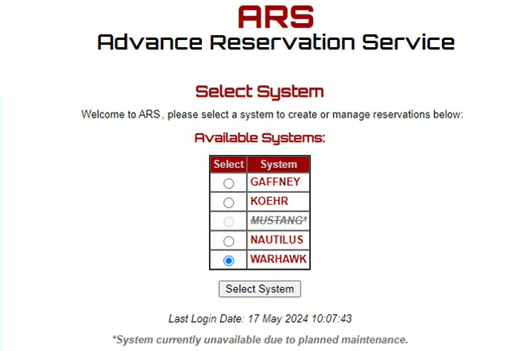
Page 5: System Selection
4. The Reservation Calendar
The Reservation Calendar (Page 6) shows reservations that are currently in place for all users of the selected system. This page allows you to see time slots available for nodes during the reservation request process.
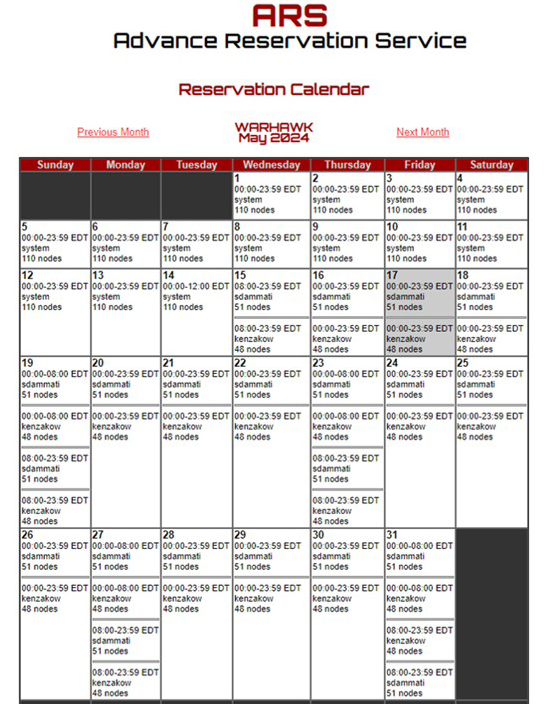
Page 6: Reservation Calendar Page
4.1. Viewing Daily Details
The Reservation Usage (Daily Detail) page (Page 7) shows reservations that are currently in place for all users of the selected system. This page allows you to see time slots available for nodes during the reservation request process.
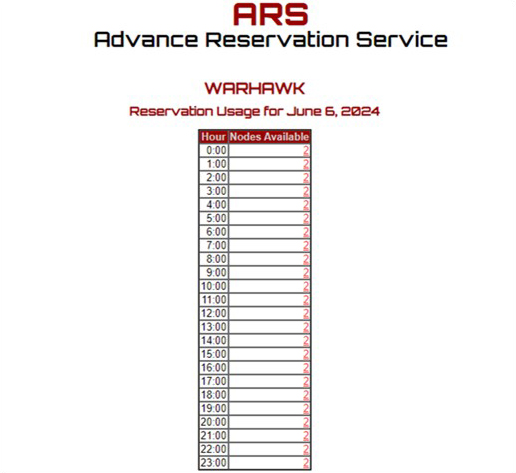
Page 7: Reservation Usage (Daily Detail) Page
4.2. Searching for Job Slots
Using the Job Slot Search (JSS) feature of ARS, available time slots for reservation requests may be obtained by providing the number of nodes, wall time, project, and other desired reservation parameters. Once successfully authenticated into ARS and selecting the desired system to request a reservation, selecting the "Job Slot Search (JSS)" button from the side menu displays the Job Slot Search form (Page 8).
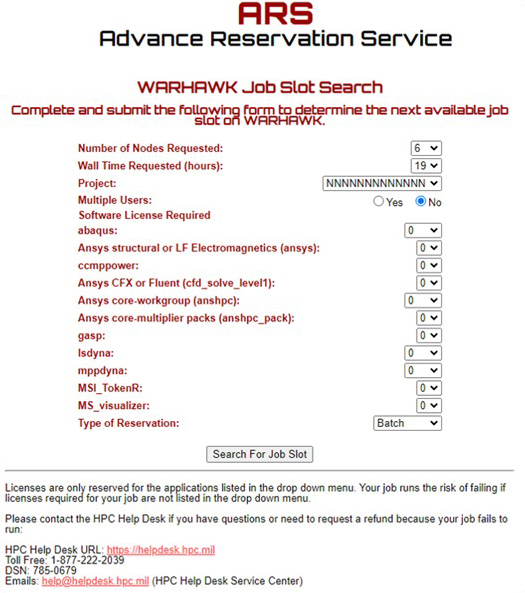
Page 8: Job Slot Search Page
After entering and submitting the number of nodes requested, wall time requested, desire to include additional users, requested software licenses, and reservation type, you are either prompted to first select the additional users (Page 9) if multiple users were requested, or to select from a list of available slots for the reservation (Page 9). If multiple users are requested, the list of available reservation slots is displayed after selecting the additional users.
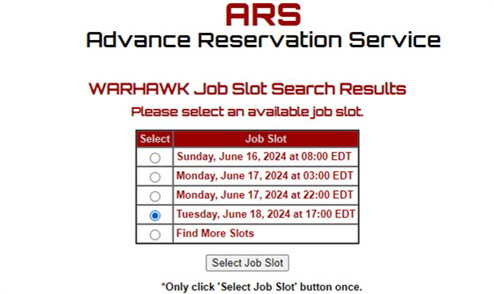
Page 9: Job Slot Search Results Page
After reviewing the list of available job slots matching the submitted reservation parameters on the Job Slot Search Results page (Page 9), you may select either a desired job slot or the "Find More Slots" option. If the "Find More Slots" option is selected, you are presented with the next available set of job slots that meet the submitted reservation parameters. You may continue to select this option until a desirable job slot is found. Upon selecting and submitting a desired job slot, you are then prompted to confirm that selection on a confirmation page (Page 10).
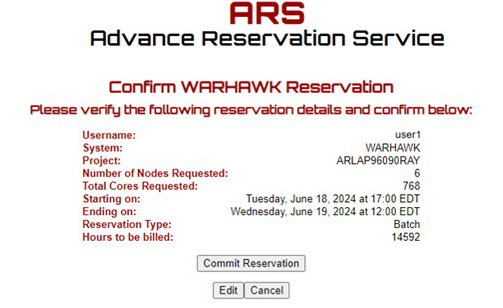
Page 10: Confirm Reservation Page
5. Making a Reservation
Once a system is selected, a calendar is presented for the current month with a node availability indicator. You can find a day (and timeframe) with the number of required nodes available. This is the Reservation Request page, and reservations can only be made on this page. By clicking the nodes available indicator for a day on the calendar, the hourly availability of nodes is displayed (Page 7). A display of future months is available via the "Calendar" link on the left-hand side of the page. When the "Calendar" link is clicked, a new window presents (Page 6) a scrollable month view to see long-term node availability. Reservations may not be made more than three months in advance, so the "Calendar" view only displays up to three months into the future. Page 6 shows the calendar display on the Reservation Request page.
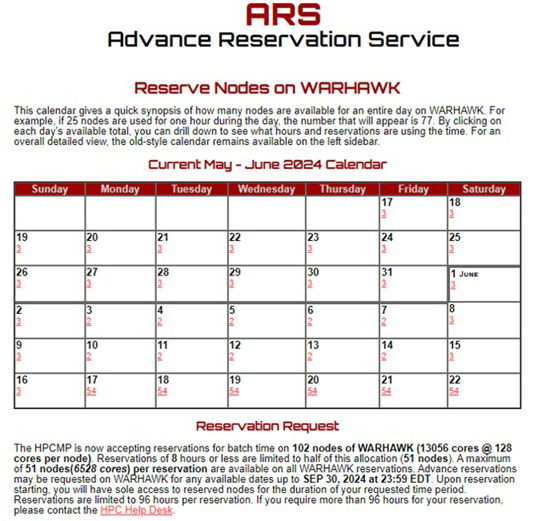
Page 11: Reservation Request Page
Since there is no direct path between ARS and the Queuing software on the HPC machine, it is possible for a reserved node to go down between the time the reservation is created and the time the reservation begins. If this happens, ARS has no way of knowing. But the Queuing software knows and does not attempt to run a job if it needs to use a broken node. Now you are confronted with a job that won’t run despite ARS claiming all is well.
We recommend you request at least two more nodes than you need. And, if more nodes are needed, the increased number should be a multiple of two. You'll take a hit on your project’s allocation, but it acts as job insurance.
5.1. Reservation Options
The remainder of the Reservation Request page is shown in Page 13. On this extended page you are presented with:
- Whether to allow additional users on the same project to share the reservation
- A selection menu listing projects with remaining allocation on the selected host
- The number of nodes requested for the reservation
- The start date and time for the reservation
- The end date and time for the reservation
- A reservation type: interactive or batch
- A list of licensed software for which licenses can be reserved, with a license count field for each piece of licensed software
Some systems offer the ability to select different node types. There are two different methods in ARS in which this is available. First, a selection is shown for each node type available (Page 12). You can reserve multiple different node types for a single reservation or a single node type by leaving the selection at 0. Page 12 displays the nodes requested option followed by the memory selection (Normal, Big, or Graphic). You can select a single node type for the reservation for the number of nodes requested.
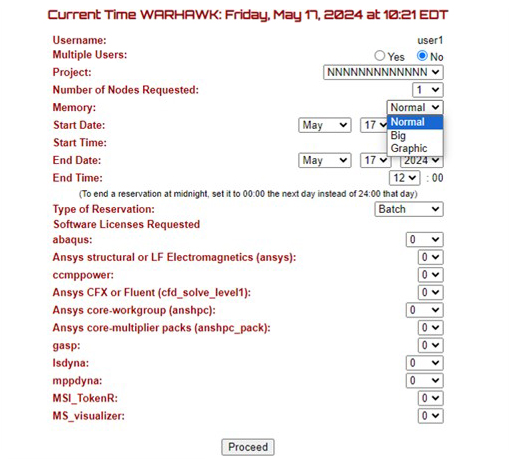
Page 12: Node Type Selection
All these fields, except software license fields, are required to request a reservation. If the "Multiple Users" option is selected, you are forwarded to a Multiple User Selection form (Page 14). Only users on the same project selected are available. Sharing the reservation details and subsequent notifications to additional users is left entirely to the discretion of the requesting user and is not a capability provided by ARS. Upon submission of the request, the data is validated against existing reservations on the selected system and then submitted to the requested machine. If software licenses are required, those are checked for availability first, before requesting actual reservations at the specified host. If requested licenses are not available at the specified time, the reservation is not requested at the host, and you are notified that licenses are not available. At the conclusion of the reservation period, the project is billed in CPU hours for the duration of the reservation. Jobs submitted against the reservation that charge to another project (not associated with the reservation) are billed against the projects specified at job submittal time. All other CPU hours, whether for actual jobs run or for idle time, are billed to the project noted during the creation of the reservation. If the reservation cannot be made at the requested system, you are notified.
Default limits on reservations are:
- A single user cannot use more than 50% of ARS-assigned resources at one time.
- A single reservation cannot be more than 168 hours in length.
- User's project allocation is checked at reservation creation time for validity.
- Reservations must be made at least 96 hours prior to reservation commencement.
- Reservations must be deleted at least eight hours prior to their commencement; otherwise, your project is billed for the reservation.
- A single user can have up to four reservations active at any time on a specific system. However, as stated above, no single user can use more than 50% of ARS assigned resources at any one time.
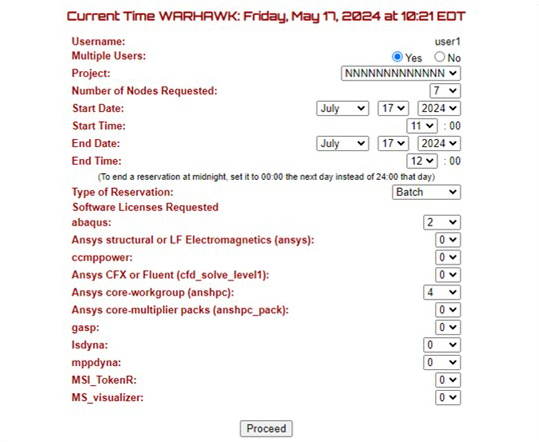
Page 13: Reservation Request Page (continued)
5.2. Selecting Multiple Users
If "Yes" has been selected for the "Multiple Users" option on the Reservation Request Page, the Multiple User Selection page will be displayed. This page will display all users with accounts on the selected System who are associated with the selected project. All users selected on this page will also be able to submit jobs against the created reservation.
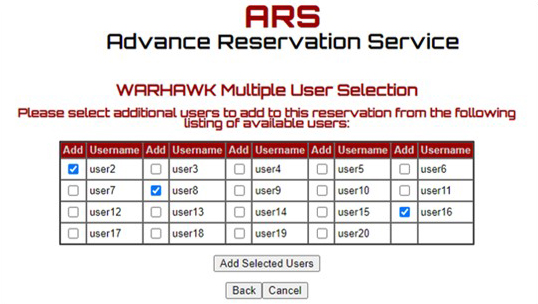
Page 14: Multiple User Selection Page
6. Reservation Confirmation
Upon successful completion of the reservation request, a confirmation page is presented (Page 15). Additionally, an email is sent notifying you of all pertinent data concerning the reservation. Email is also sent two days prior and two hours prior before the reservation starts.
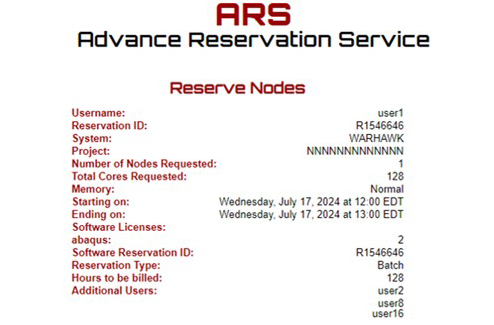
Page 15: Reservation Confirmed Page
Note: It is your responsibility to make use of the reserved nodes. You must log on to the selected system and submit a job to the reservation explicitly by using the queue name generated by the job scheduler (sent via email) at the time of the reservation creation.
qsub -q R15 myjob                # in PBS
sbatch --reservation R15 myjob   # in Slurm
Both PBS Pro and Slurm support interactive jobs if selected via the pull-down menu. For PBS Pro, the nodes can be used interactively by adding the -I option to the above command. For Slurm, the nodes can be used interactively by using the srun command instead of the sbatch command.
6.1. Viewing Your Reservations
The reservations for all users can be seen on the Reservation Usage (Hourly Detail) page (Page 16) by selecting the node available indicator on the Reservation Usage (Daily Detail) page.
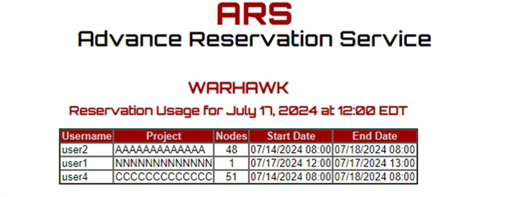
Page 16: Reservation Usage (Hourly Detail) Page
7. Cancelling a Reservation
Reservations can be canceled by selecting the "Cancel Reservation" link on the left-hand side of the page (Page 17). Specific reservations can be canceled by checking the box associated with the reservation and then clicking the "Cancel Reservations" button. All checked reservations are canceled at the remote system, and your project is not charged for the reservation if it is canceled at least eight hours before the reservation is scheduled to begin. Otherwise, your project is charged for the entire reservation.
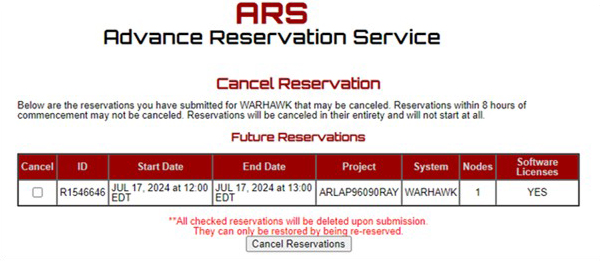
Page 17: Reservation Cancellation Page
Upon successful cancellation, you are shown the Reservation Cancelled page (Page 18) and sent an email.

Page 18: Reservation Cancelled Page
